2021年12月23日 星期四

Xamarin.form 如果你用的是shell架構,如何 handle "back button"事件

 最近因為要在back (< ) button事件中加上動畫(沒辦法,資料總是要從網路下載)

真的是試破頭殼了

其原因是因為我忘了是套用了shell架構,所以content page上方的back button點擊時是不會觸發OnBackButtonPressed 事件的 (但如果是用螢幕下方的 "<" button,是會觸發這個事件的)

好在先進有類似的情境(如,回上一頁時要先做確認的動作)

這時就可以參考這篇文章了

在此介紹給xamarin form的同好

一起加油吧!!

2021年12月21日 星期二

OSM圖資概念相關連結

 osm的技術官網:

https://wiki.openstreetmap.org/wiki/API

在的網頁內嵌入osm,ref https://noob.tw/openstreetmap/

tile的觀念: http://blog.changyy.org/2012/05/openstreetmap-api.html 

(觀念很重要,因為日後從緯經度推算tile一定會用到)

就static map而言,就應該是緯經度推算成tile,所以請參考以下網址

https://wiki.openstreetmap.org/wiki/Slippy_map_tilenames


有了tile,那推算出大致位置的方式,就用比例去推算了

參考這則討論


如果,你真的只是要產出幾張圖,那就到

https://www.openstreetmap.org 用右手側工具區有個「分享」icon 
就可把你目前看到的地圖輸出成png/jpeg/pdv/svg 了
(有了底圖了,那在上面加些圖示標記就是你的事了)
大不了時辰到了,不,時間到了,再叫值日生來這下載圖片來用
(如果卡骨力一點,你直接用browser的debuger去看reuqest送出什麼,自己包api也行)

如果貴公司的用量(請求數)每月不超過15000次請求的話,那就去MapQuest註冊API來用吧
https://business.mapquest.com/pricing-plans


O.S.明明專案只是要幾張可能不會異動的地圖,居然花了半個月來study這東西,沒辦法,Google map是要錢的啊....


2021年12月10日 星期五

how to resize an existing vdi disk in vbox + resize an Ubuntu 18.04/20.04 LVM disk

step 1..to resize vdi of VBox ,please refer to :

https://www.howtogeek.com/124622/how-to-enlarge-a-virtual-machines-disk-in-virtualbox-or-vmware/

 File > Virtual Media Manager in the main VirtualBox window

step2 .extend to 100 free space.

ref:
https://kb.vander.host/operating-systems/how-to-resize-an-ubuntu-18-04-lvm-disk/

用sudo -i  (root身份去執行)

其中,

-------------------------------------

user@server:~# parted
GNU Parted 3.2
Using /dev/sda
Welcome to GNU Parted! Type 'help' to view a list of commands.
(parted) resizepart
Partition number? 3
End? [26.8GB]?   <--這地方要自己輸入,不能只按enter,
因為parted 是不知道你有多少空間可以用 
(在上一個指令「fdisk -l」裡「Disk /dev/sda: 30.25 GiB」就是我們可用(用步驟1改的vdi大小)的大小,
所以請在此填入32.25G)
(parted) quit
Information: You may need to update /etc/fstab.
----------------------------------------------
接著用
 pvresize /dev/sda3
上述才會生效
又,我是直接用「lvextend -l +100%FREE /dev/mapper/ubuntu--vg-ubuntu--lv」
確定它出現以下訊息
------------------------------------------
 Size of logical volume ubuntu-vg/ubuntu-lv changed from <9.00 GiB (2303 extents) to 29.24 GiB (7486 extents).
  Logical volume ubuntu-vg/ubuntu-lv successfully resized.
---------------------------------------------
才是正確地完成了lvextend指令,
當然別忘了之後的「resize2fs /dev/mapper/ubuntu--vg-ubuntu--lv」指令,再用df -h 確定LVM有擴充
才是真的功德圓滿了
以上,加油了!!

------------------------------------

apt-update時遇到「Err:1 http://tw.archive.ubuntu.com/ubuntu focal InRelease Splitting up /var/lib/apt/lists/tw.archive.ubuntu.com_ubuntu_dists_focal_InRelease into data and signature failed」錯誤訊息

 最近在用ubuntu 安裝sql server 時出現以問題
-------apt update後----
Hit:1 http://tw.archive.ubuntu.com/ubuntu focal InRelease
Hit:2 http://tw.archive.ubuntu.com/ubuntu focal-updates InRelease
Hit:3 http://tw.archive.ubuntu.com/ubuntu focal-backports InRelease
Hit:4 http://tw.archive.ubuntu.com/ubuntu focal-security InRelease
Err:1 http://tw.archive.ubuntu.com/ubuntu focal InRelease
  Splitting up /var/lib/apt/lists/tw.archive.ubuntu.com_ubuntu_dists_focal_InRelease into data and signature failed
Err:2 http://tw.archive.ubuntu.com/ubuntu focal-updates InRelease
  Splitting up /var/lib/apt/lists/tw.archive.ubuntu.com_ubuntu_dists_focal-updates_InRelease into data and signature failed
Err:3 http://tw.archive.ubuntu.com/ubuntu focal-backports InRelease
  Splitting up /var/lib/apt/lists/tw.archive.ubuntu.com_ubuntu_dists_focal-backports_InRelease into data and signature failed
------------------------------------------
google了一下,有些解法
1.直接用「apt-get clean」在這討論的內容
2.dhcp問題  ,參考這裡
我是用apt-get clean解決的
為了怕日後遇到又要查很多,特此誌之

2021年12月1日 星期三

Dictionary to Dynamic class object

在轉成json時常常有動態屬性的必要,這時dictionary是很需要的

以下是個不錯的extension,來源在此 

直接copy paste 了

-----------------------------------------------

public static class Extensions
{
    public static void AddRange<T>(this ICollection<T> collection, IEnumerable<T> items)
    {
        foreach (var item in items)
        {
            collection.Add(item);
        }
    }

    public static dynamic ToDynamicObject(this IDictionary<string, object> source)
    {
        ICollection<KeyValuePair<string, object>> someObject = new ExpandoObject();
        someObject.AddRange(source);
        return someObject;
    }
}
----------------------------------------------

很好用,推薦給c# codder們

2021年11月30日 星期二

Ubuntu 20.04+ asp.net core webapi + Nginx 速戰速決

---這裡沒有什麼原理解說(因為我也不懂),如果先進要補充指正的....麻煩鞭小力一點-----

先安裝.net sdk & runtime環境

 ref : https://tecadmin.net/how-to-install-net-core-on-ubuntu-20-04/

裝.net之後,移駕到我們複製上去的webapi專案publish資料夾裡

用「dotnet xxxx.dll」啟動那個webapi (以vs2019提供的weatherforecase範例為例)

然後用curl http://locahost:5000/weatherforecast 測看看.net core runtime & web api有沒有起來

有出現該有的json資料,有再進行Nginx安裝

接著安裝nginx

install nginx,別忘了先去找到80 port的服務先關掉.(指令 sudo netstat -peanut|grep ":80 " )

之後.安裝nginx

----------------------

sudo apt install nginx

---------------------------

---start nginx by command---


sudo systemctl start nginx

----------------------------------

//用localhost檢查Nginx有沒有起來

因為我們新的環境允許對個別site做port&SSL 設定,

所以我們只要在nginx加個site config檔就可以

但是cert & pem是一定要做,參考黑暗大大的好文

https://blog.darkthread.net/blog/aspnetcore-with-nginx/

----------因為private目錄已經有了,所以要另外定義一個資料夾-----------------------

sudo mkdir /etc/ssl/private4ngix

sudo chmod 700 /etc/ssl/private4ngix

//以下的360是天數

sudo openssl req -x509 -nodes -days 365 -newkey rsa:2048 -keyout /etc/ssl/private4ngix/nginx-selfsigned.key -out /etc/ssl/certs/nginx-selfsigned.crt

sudo openssl dhparam -out /etc/ssl/certs/dhparam.pem 2048

------------------------------------------

---要把port 80錯開(不然其他用到80port的東西會起不來),

因為不想一一說明,我直接給你.conf檔,日後有需要再行調整/新增
------------/etc/nginx/nginx.conf-----------------------------------------------------
user www-data;
worker_processes auto;
pid /run/nginx.pid;
include /etc/nginx/modules-enabled/*.conf;

events {
worker_connections 768;
# multi_accept on;
}

http {

##
# Basic Settings
##

sendfile on;
tcp_nopush on;
tcp_nodelay on;
keepalive_timeout 65;
types_hash_max_size 2048;
# server_tokens off;

# server_names_hash_bucket_size 64;
# server_name_in_redirect off;
        include /etc/nginx/proxy.conf;

include /etc/nginx/mime.types;
default_type application/octet-stream;

##
# SSL Settings
##

ssl_protocols TLSv1 TLSv1.1 TLSv1.2 TLSv1.3; # Dropping SSLv3, ref: POODLE
ssl_prefer_server_ciphers on;

##
# Logging Settings
##

access_log /var/log/nginx/access.log;
error_log /var/log/nginx/error.log;

##
# Gzip Settings
##

gzip on;

# gzip_vary on;
# gzip_proxied any;
# gzip_comp_level 6;
# gzip_buffers 16 8k;
# gzip_http_version 1.1;
# gzip_types text/plain text/css application/json application/javascript text/xml application/xml application/xml+rss text/javascript;

##
# Virtual Host Configs
##

include /etc/nginx/conf.d/*.conf;
include /etc/nginx/sites-enabled/*;
}


#mail {
# # See sample authentication script at:
# # http://wiki.nginx.org/ImapAuthenticateWithApachePhpScript
# # auth_http localhost/auth.php;
# # pop3_capabilities "TOP" "USER";
# # imap_capabilities "IMAP4rev1" "UIDPLUS";
# server {
# listen     localhost:110;
# protocol   pop3;
# proxy      on;
# }
# server {
# listen     localhost:143;
# protocol   imap;
# proxy      on;
# }
#}
---------------------------------------------------------------------------
------------/ext/nginx/proxy.conf---------------------------------
proxy_redirect          off;
proxy_set_header        Host $host;
proxy_set_header        X-Real-IP $remote_addr;
proxy_set_header        X-Forwarded-For $proxy_add_x_forwarded_for;
proxy_set_header        X-Forwarded-Proto $scheme;
client_max_body_size    10m;
client_body_buffer_size 128k;
proxy_connect_timeout   90;
proxy_send_timeout      90;
proxy_read_timeout      90;
proxy_buffers           32 4k;
-----------------------------------------------------------
把預設的nginx port80切到9090,因為port 80已經被佔用了
-----------------/ext/nginx/sites-enable/default----------------------
##
# You should look at the following URL's in order to grasp a solid understanding
# of Nginx configuration files in order to fully unleash the power of Nginx.
# https://www.nginx.com/resources/wiki/start/
# https://www.nginx.com/resources/wiki/start/topics/tutorials/config_pitfalls/
# https://wiki.debian.org/Nginx/DirectoryStructure
#
# In most cases, administrators will remove this file from sites-enabled/ and
# leave it as reference inside of sites-available where it will continue to be
# updated by the nginx packaging team.
#
# This file will automatically load configuration files provided by other
# applications, such as Drupal or Wordpress. These applications will be made
# available underneath a path with that package name, such as /drupal8.
#
# Please see /usr/share/doc/nginx-doc/examples/ for more detailed examples.
##

# Default server configuration
#
server {
listen 9090 default_server;
listen [::]:9090 default_server;

# SSL configuration
#
# listen 443 ssl default_server;
# listen [::]:443 ssl default_server;
#
# Note: You should disable gzip for SSL traffic.
# See: https://bugs.debian.org/773332
#
# Read up on ssl_ciphers to ensure a secure configuration.
# See: https://bugs.debian.org/765782
#
# Self signed certs generated by the ssl-cert package
# Don't use them in a production server!
#
# include snippets/snakeoil.conf;

root /var/www/html;

# Add index.php to the list if you are using PHP
index index.html index.htm index.nginx-debian.html;

server_name abc.mycompany.com;

location / {
# First attempt to serve request as file, then
# as directory, then fall back to displaying a 404.
try_files $uri $uri/ =404;
}

# pass PHP scripts to FastCGI server
#
#location ~ \.php$ {
# include snippets/fastcgi-php.conf;
#
# # With php-fpm (or other unix sockets):
# fastcgi_pass unix:/var/run/php/php7.4-fpm.sock;
# # With php-cgi (or other tcp sockets):
# fastcgi_pass 127.0.0.1:9000;
#}

# deny access to .htaccess files, if Apache's document root
# concurs with nginx's one
#
#location ~ /\.ht {
# deny all;
#}
}


# Virtual Host configuration for example.com
#
# You can move that to a different file under sites-available/ and symlink that
# to sites-enabled/ to enable it.
#
#server {
# listen 80;
# listen [::]:80;
#
# server_name example.com;
#
# root /var/www/example.com;
# index index.html;
#
# location / {
# try_files $uri $uri/ =404;
# }
#}
------------------------------------------------------------------
同理,因為port 443也被佔用了,所以我們的web api也要改到別的port,下例為https://網站IP:4430/....
--------/etc/nginx/sites-enable/api_port_4430.conf---------------
日後新的專案請比照新增這檔案就可以了,當然asp.net webapi的launchSettings.json裡的port也要錯開就是了
----------------------------------------------------------------------------
server {
    listen 4430 http2 ssl;
    listen [::]:4430 http2 ssl;

    server_name abc.mycompany.com;

    ssl_certificate /etc/ssl/certs/nginx-selfsigned.crt;
    ssl_certificate_key /etc/ssl/private4ngix/nginx-selfsigned.key;
    ssl_dhparam /etc/ssl/certs/dhparam.pem;

    underscores_in_headers on;

    location / {
        proxy_pass_request_headers on;
        proxy_pass         http://localhost:5000;
        proxy_http_version 1.1;
        proxy_set_header   Upgrade $http_upgrade;
        proxy_set_header   Connection keep-alive;
        proxy_set_header   Host $host;
        proxy_cache_bypass $http_upgrade;
        proxy_set_header   X-Forwarded-For $proxy_add_x_forwarded_for;
        proxy_set_header   X-Forwarded-Proto $scheme;
        proxy_redirect     http://localhost:5000/ http://$host:$server_port;
    }
}
-------------------------------------------------
asp.net webapi方面,因應Nginx proxy forward需要,請在setup做以下調整
---------------------------------------------------------------
public void Configure(IApplicationBuilder app, IWebHostEnvironment env) {

  if(RuntimeInformation.IsOSPlatform(OSPlatform.Linux)) {
                app.UseForwardedHeaders(new ForwardedHeadersOptions {
                    ForwardedHeaders=ForwardedHeaders.XForwardedFor|ForwardedHeaders.XForwardedProto,
                    ForwardedForHeaderName="CF-CONNECTING-IP"
                });
            }
//以下照舊...
--------------------------------------------------
別忘了sudo ufw allow 剛才那些新開的port.
其他(把dotnet xxxx.dll設定做service,以便開機啟動等)
請參考
https://docs.microsoft.com/zh-tw/aspnet/core/host-and-deploy/linux-nginx?view=aspnetcore-6.0
之「建立服務檔」單元
本文多數資訊是來自
特此誌謝

(以上範例皆為虛構,如有雷同純屬故意調工)


2021年11月19日 星期五

for Xanarin.Form : 「處理中」的過場提示訊息

 最近想說MAUI快拍板定案了,那麼Xamarn.Form 這幾年經過各位大神補完下來也應該夠成熟好用了.

真正是「明仔在的窟仔,咱微軟給你挖便便啊」..呃.不是啦,是「明仔在的氣力,咱Xamarin給你傳便便啊」(碼你個B~),所以下個案子,可以考慮用xamarin.form加速開發

我個人最常在畫面會用到的東西是那些過場畫面效果元件,像是「處理中....」這類的東西,所以今天就小小分享一下實作及效果的差異 

(先不說  DisplaySnackBarAsync ,如果你不要自帶動畫的話,這可以直接套用,參考這個影音教學)

先開箱Popup元件,這東西不錯用,日後會非常倚重它,參考以下教學網址
Pass Data From and To Popups with Xamarin Community Toolkit
直接上code

-----ProcessingPopup.xmal--------------------------

<?xml version="1.0" encoding="UTF-8" ?>
<xct:Popup
    xmlns="http://xamarin.com/schemas/2014/forms"

    xmlns:x="http://schemas.microsoft.com/winfx/2009/xaml"
    xmlns:xct="http://xamarin.com/schemas/2020/toolkit"
    xmlns:local="clr-namespace:LoraWanApp.Views.PopUp"

    x:TypeArguments="local:PopupResult"
    Size="300,150"
    IsLightDismissEnabled="False"
    x:Class="mycompany.Views.PopUp.ProcessingPopup">
    <StackLayout>

        <Label x:Name="myLabel"  Text="Porcessing......." VerticalOptions="CenterAndExpand"                    HorizontalOptions="CenterAndExpand"/>

    </StackLayout>
</xct:Popup>

----ProcessingPopup.xmal.cs------------------

//Clasable介面沒什麼東西,就只有一個DoClose函數罷了

public class PopupResult {
        public string ReturnData { get; set; }
 }
public partial class ProcessingPopup : Popup<PopupResult>, Closable {
        private PopupResult _result;
        int count = 1;
        bool toLoop = true;
        public ProcessingPopup(PopupResult result) {
            InitializeComponent();
            _result=result;

           //順便學會在form裡用執行緒的技巧
          //UI thread請參考這裡(楓花雪岳)更詳細說明

            Device.BeginInvokeOnMainThread(async () => {
                while(toLoop) {
                    if(count>5)
                        count=1;
                    myLabel.Text="Please Wait"+".....".Substring(0, count);
                    count++;
                    await Task.Delay(500);
                }
                //DoClose();
            });
    }
        public async void DoClose() {
            toLoop=false;
            await Task.Delay(500);
            Dismiss(new PopupResult {
                ReturnData="Close from  Login"
            });
        }
    }

---------------------------------------The caller -- LoginPage.xmal.cs---------------------------
  login按鈕事件:

           //可以用這方式把參數傳給popup   
          var popupResult = new PopupResult {
                ReturnData="Initial data"
            };
            var popup = new ProcessingPopup(popupResult);
            var result = Navigation.ShowPopupAsync(popup) ;  <-- Xamarin.CommunityToolkit.Extensions的popup召喚術!!
            await Task.Delay(10000);//模擬呼叫遠端作業,讓子彈飛一會
            popup.DoClose();
            var r2=await result;
            //日後用到popup做一些比較複雜的對話介面時,就會需要用到傳回技術了
            await DisplayAlert("get msg from Processing", $"return value:{ r2.ReturnData}", "OK");
            await Shell.Current.GoToAsync($"//{nameof(AboutPage)}");
------------------------------------------------------------------------------------------------------------
結果: 左為IOS,右為android,可惜的是目前沒有mask選項可以設定,當然你可以在popup裡加上一些小動畫元件,這次我只是用文字做測試,以確定GUI thread可以運作.有必要時再加上frame或許會好一點


「阿你之前用AndroidHud & BTProgressHUD 很好看啊,怎麼不拿來用? 」...好吧,可是AndroidHud是有點東西要加工的,
原本在Xamarin.Android裡的一堆函數會用到的ActivityContext
如「AndroidHUD.AndHUD.Shared.Show(this,"msg",-1,MaskType.Clear)」這裡面的 this是當下的ActivityContext,移植到Xamarin.Form就是Forms.Context,但是!!!!...
Xamarin.Form 2.5之後就不給用Forms.Context,所以要另外加點工
(討論參考這裡)
經上述討論建議,我直接改了Application那裡....
--------------MainApplication.cs----------------------------------

[Application]
public partial class MainApplication : Application, Application.IActivityLifecycleCallbacks {
internal static Context ActivityContext { get; private set; }
public MainApplication(IntPtr handle, JniHandleOwnership transfer) : base(handle, transfer) { }
public override void OnCreate() {
base.OnCreate();
RegisterActivityLifecycleCallbacks(this);
}
public override void OnTerminate() {
base.OnTerminate();
UnregisterActivityLifecycleCallbacks(this);
}
public void OnActivityCreated(Activity activity, Bundle savedInstanceState) {
ActivityContext=activity;
}
public void OnActivityResumed(Activity activity) {
ActivityContext=activity;
}
public void OnActivityStarted(Activity activity) {
ActivityContext=activity;
}
public void OnActivityDestroyed(Activity activity) { }
public void OnActivityPaused(Activity activity) { }
public void OnActivitySaveInstanceState(Activity activity, Bundle outState) { }
public void OnActivityStopped(Activity activity) { }
---------------------------------------------------
------Android實作---------------------------------
    public class DroidHudToaster : IProcessingToast {
        public void dismissProcessAndShowMsg(bool success, string msg) {
            AndHUD.Shared.Dismiss();
            if(success) {
                AndHUD.Shared.ShowSuccessWithStatus(MainApplication.ActivityContext, msg, MaskType.Black, TimeSpan.FromSeconds(3));
            } else {
                AndHUD.Shared.ShowErrorWithStatus(MainApplication.ActivityContext, msg, MaskType.Black, TimeSpan.FromSeconds(3));
            }
        }
        public void showProcessing(string processingMsg = null) {
            AndroidHUD.AndHUD.Shared.Show(MainApplication.ActivityContext,
               (string.IsNullOrWhiteSpace(processingMsg) ? "Loading..." : processingMsg), -1, MaskType.Clear);
        }
    }

------IOS實作----------------------------------
    public class IosToaster : IProcessingToast {
        public void dismissProcessAndShowMsg(bool success, string msg) {
            BTProgressHUD.Dismiss();
            if(success) {
                BTProgressHUD.ShowSuccessWithStatus($"Process Ok:{msg}", MaskType.Black, 3000);
            } else {
                BTProgressHUD.ShowErrorWithStatus($"Errors msg:{msg}", MaskType.Black, 3000);
            }
        }
        public void showProcessing(string processingMsg=null) {
            BTProgressHUD.ShowContinuousProgress((string.IsNullOrWhiteSpace(processingMsg) ? "Loading..." : processingMsg), MaskType.Black);
        }
    }
----------------------------在共同專案裡用DI呼叫---------------
             DependencyService.Get<IProcessingToast>()?.showProcessing("Login now....");
            await Task.Delay(5000);
            DependencyService.Get<IProcessingToast>()?.dismissProcessAndShowMsg(true, "Login OK");
            await Task.Delay(3000);
            await Shell.Current.GoToAsync($"//{nameof(MainFuncsPage)}");
-------------------------------------------------------------------------
結果..... (左為ios,右為android) 果然是DI大法好啊...
-----------------------------------------------------------------

------------------------------------------------------------------------------ 
相信日後MAUI也要更好用好開發了
一起加油吧!!


2021年9月10日 星期五

For Xamain.IOS:File sharing需要什麼條件

 參考文件,請參考官方範例
https://docs.microsoft.com/zh-tw/xamarin/ios/app-fundamentals/file-system

info.plist需要兩個鍵值,如果光只有「UIFileSharingEnabled」

是無法在你的iphone上面的檔案app裡找到你的app分享出來的檔案的

想要讓iphone的「檔案」app用瀏覽「我的iphone」裡出現你的app icon資料夾(MyDocument).

就要另一個鍵值--「LSSupportsOpeningDocumentsInPlace」了

這篇也是不錯的討論,用模擬器開發的朋友可以參考

可是問題來了,先前你放在MyDocument裡特殊資料(像是json啦、SQLite db啦.....)不就都被看光了?

解決之道就在最初那份文件--把敏感資料搬到MyDocument上層的library裡就是了

(至於用「更新」的方式搭配上述的搬檔,有沒有work,知道的朋友麻煩指導在下一下,謝謝先了)


同場加映:

Xamarin.android的下載目錄在哪?

答案 : Android.OS.Environment.GetExternalStoragePublicDirectory(Android.OS.Environment.DirectoryDownloads).AbsolutePath

以上,大家加油了


2021年9月6日 星期一

For Xamarin Android: 比較簡潔地請求權限

 之前到安卓8以後已經有一種寫法了,太煩瑣了,

好在最近又有update了

今天把它記錄下來,以免下次又要找到天窮碧落下黃泉之窘境了

------------------------------------------------------

using Xamarin.Essentials;

...

 protected override void OnCreate(Bundle savedInstanceState) {

            base.OnCreate(savedInstanceState);

            Xamarin.Essentials.Platform.Init(this, savedInstanceState);

  ...

  }

//-----以下整碗做你捧去,我也是copy改出來的-------

public override void OnRequestPermissionsResult(int requestCode, string[] permissions, Android.Content.PM.Permission[] grantResults) {

            Xamarin.Essentials.Platform.OnRequestPermissionsResult(requestCode, permissions, grantResults);

            base.OnRequestPermissionsResult(requestCode, permissions, grantResults);

        }

        public async Task<Xamarin.Essentials.PermissionStatus> CheckAndRequestPermissionAsync<T>(T permission)

                    where T : Xamarin.Essentials.Permissions.BasePermission {

            var status = await permission.CheckStatusAsync();

            if (status != Xamarin.Essentials.PermissionStatus.Granted) {

                status = await permission.RequestAsync();

            }

            return status;

        }

//以下以存檔權限為例,請自己改其他權限來用

        public async Task ExportToExcelnAsync() {

            var status = await CheckAndRequestPermissionAsync(new Xamarin.Essentials.Permissions.StorageWrite());

            if (status != Xamarin.Essentials.PermissionStatus.Granted) {

                // Notify user permission was denied

                return;

            }


            await  你預訂得到權限後要做的事();

        }

   //-----Code海無邊,回頭是岸-----

--------------------------------

為什麼要寫出套件全名?因為很不巧一個叫「Plugin」的套件也有類似的權限套件

為了不被混淆,就全名標示了

本文技巧出處參考這裡

PS. 拜託安卓跟蘋果:你們可以不要再改了嗎?每次一版我就要重學,很累的耶,能不能像大話西遊一樣「如果非要在這些架構套件開發技術上加一個期限,我希望是……一萬年」啊


2021年8月7日 星期六

for xamarin android :「android string types not allowed (at 'background' with value ' '). 」發生在第2行

 最近應人客的要求,小改界面(layout file),可是build卻出現了「android string types not allowed (at 'background' with value ' ').」而且是在第二行.....


可是明明在xml中第2行也不是background的設定啊...

------------------------------------------------------

<?xml version="1.0" encoding="utf-8"?>

<LinearLayout xmlns:android="http://schemas.android.com/apk/res/android"

    xmlns:app="http://schemas.android.com/apk/res-auto"

     android:layout_width="match_parent"

    android:layout_height="match_parent"

    android:background="@android:color/white"

    android:orientation="horizontal">

....

.....

------------------------------------------------------

到底遇到了什麼靈異事件了!? (就算把上述的background行拿掉,re build還是一樣的錯誤訊息)


答案是.....錯誤訊息的「行」是xml reader read 進去時以xml節點去算的,第一行是<?xml versin.....?>

而其他的元素,就算在第二行,如同意大利線條一整條吃進去,,所以在其中任意子節點的錯,都算在第2行裡

所以,就算是把最開頭的LinearLayout裡的background行刪去,只要整個xml檔其他地方有錯,都是出現「第二行出錯」的訊息 (就算是在layout designer看來都對的情況下)

但,好歹知道是background屬性錯了,那就一個一個background屬性去找就對了

好,最有可能是不小心改到的background值.

------------------------------------------

 <ImageButton

            android:id="@+id/xxxxxxxx"

            android:layout_width="wrap_content"

            android:layout_height="wrap_content"

            android:layout_alignParentLeft="true"

            android:layout_centerVertical="true"

            android:background=""

             />

----------------------------------

少年仔,background沒咧安呢用的,要嘛就不寫,要不就用"@null"  就是了

(但,如果你有  android:src="@drawable/xxxx" 屬性,卻想設定他去背--支援透明的話,就可以設定「android:background="#00000000"」了)


總之,儘信 IDE不如無IDE啊. Layout designer看到正常的東西,未必就是正確的啊


一起加油囉


2021年8月2日 星期一

for Xamarin IOS:送Apple store審後回報出現「/System/Library/Frameworks/SensorKit.framework/SensorKit' not found」問題

 明明在IDE中用開發模式連iphone測都正常,以往這樣送審都會過,

沒辦法,現在已經規定iphone & ipad都要過才准上架

這次送審時回報app在ipad中掛了,訊息落落長,總歸這句
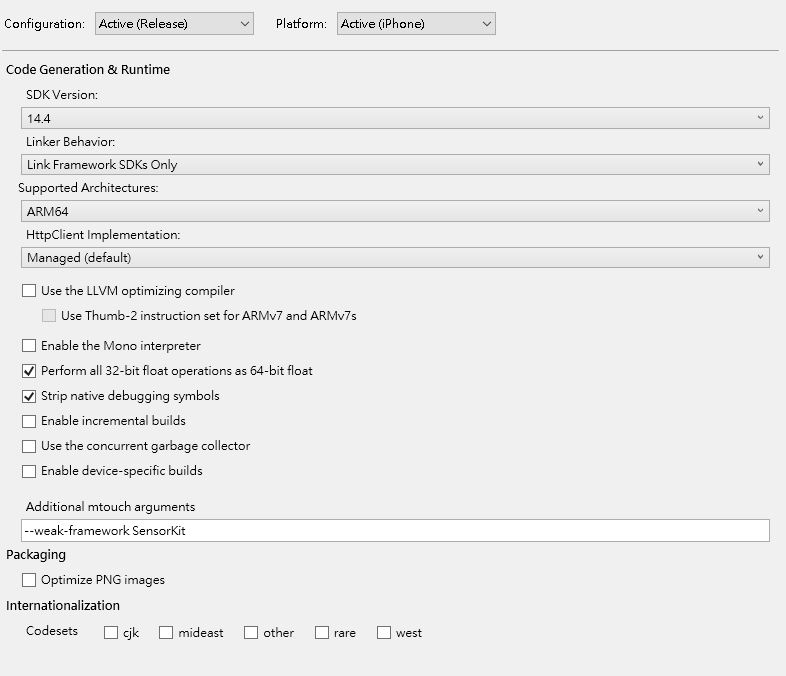
"/System/Library/Frameworks/SensorKit.framework/SensorKit' not found"

(當然也包括了明明沒用到Health Kit卻說要你移除的「建議」)

好在一堆人也幫你踢了鐵板了

最主要的就是要把link模式設定為「Link Framework SDKs Only」 (預設是Don't Link)

打包測完確定這樣link模式可以跑(而且test flight成員也測了沒事)

如果Link Framework SDKs Only會掛的話,建議降版--改用sdk 14.4

並修改info.plist版本,從14.x降回13.6

(不管你怎麼改,總而言之就是要確定「Link Framework SDKs Only」能work就是了啦)


當然如果還不放心可以在mtouch中加上--weak-framework SensorKit
再打包送審,這樣二進位檔案無法在ipad上執行的問題就會過關了
(而且連帶的healthkit問題也解決了!!!)

參考這位先進的原po

大家加油囉


同場加映:

如果在clear project時,遇到以下錯誤

----------------------------------

Clean started...

The build was cancelled because another Xamarin operation is running. Please try again in a moment.

1>Error: The operation could not be completed. 無法指出的錯誤 

========== Clean: 0 succeeded, 2 failed, 0 skipped ==========

----------------------------------

請把project  unload 再reload回去就可以了


2021年7月21日 星期三

For Xamarin ios UITextField:按下Return鍵後,收回鍵盤

明明在android這是很正常也應該給的功能 
但在IOS上就特別要再用code方式設定...
 而且還不是在xcode上透過UIBuilder設定xib檔時可以設定的 
老句話「儘信UIBuilder不如無UIBuilder」
 ----直接看code吧------
   txtField.ReturnKeyType = UIReturnKeyType.Done;
   txtField.ShouldReturn = (textFiedl) => { 
         txtField.EndEditing(true); return false; 
   }
 -------------------------
 就這樣 大家加油吧!!

2021年6月6日 星期日

use "Line notification" as notifier for system monitoring (example of 藉由命令列模式使用LINE Notify發送訊息到LINE)

login Line Notify
URL:https://notify-bot.line.me/zh_TW/

選「個人頁面」


選擇「發行權杖」

選擇要把「line Notify」加入對話的群組,賦予權杖名稱(此例是WD2 alert),點擊「發行」鍵
(以「MyGroup」為例)
網頁就會出現一串長字串的token,而你的手機會出現以下畫面


請到MyGroup中,把「Line Notify」帳號加入這個群組裡
而serverside那裡用「CURL」測試
(假設你的CURL裝在「C:\curl-7.77.0_2-win64-mingw」
那麼,系統變數「CURL_HOME」的值就是「C:\curl-7.77.0_2-win64-mingw\bin」)

%CURL_HOME%\curl https://notify-api.line.me/api/notify -X POST -H "Authorization: Bearer 我那個長長的.....TOKEN" -F "message=AlertTest FROM xxxxx" 
(技術文件上寫的是單引號,但我們是用windows base,所以是雙引號)
如果指令沒下錯的話,會回應「status 200,message ok」


而此時你的聊天室也會出現


就這樣,剩下就是watcher 去偵測系統狀態並用process.Start執行curl的事了
你必不管什麼callback跟 http2 bla bla bla的東西,夠簡單了吧,

當然你要傳圖也行,請參考官方文件

一起加油吧


2021年5月30日 星期日

for xamain.ios ,the GrowingTextView & use it as "InputAccessoryView" for other textfield/textview

環境 XCODE 12.4, IOS14.4 

1.參考「https://stackoverflow.com/questions/16868117/uitextview-that-expands-to-text-using-auto-layout」,製作grewing text view 的xib. 
(我是直接用xcode interface builder的 Hight Priority & content Hugging Priority那段去做的,畢竟我連swift都還不會)

2.參考「www.dotnetmobile.com/XamariniOS/CreatingCustomView」及「https://docs.microsoft.com/zh-tw/xamarin/ios/user-interface/storyboards/」把這個xib跟c#做連結,

參考結果
ViewGrowingText.cs  ViewGrowingText.designer.cs ViewGrowingText.xib

如果你直接把它加入UIViewController去試跑,應該是有這效果.

---sample code----

var TxtTest = UI.ViewGrowingText.Create();

 TxtTest.Frame = new CoreGraphics.CGRect(0, 200, View.Frame.Width, 30);

//viewMain是我們在xcode中用outlet指定最底層的view為此UIViewcontroller中的變數成員,基本上跟「View」這個在UIViewController中的變數是同一個東西

viewMain.AddSubview(TxtTest); 

viewMain.LayoutIfNeeded();

----------------


-----實驗完記得把這個TxtTest移掉,因為這不是我們要的結果-----

現在,我們在目前的UIViewController底部加一個TextView(或是TextField沒差)名字為「txtMsg2Send」

我們要把個GrowingTextView放到小鍵盤上面,而且要能自已依照灰色TextView加減的高度而自己跟著調整高度,要在操作txtMsg2Send會出現

直接看code吧

------------------------------------------------

 nfloat orgHeightOfTxtViewOfInputAccessoryView = 0;

UI.ViewGrowingText inputAccessoryView =null;

UITextView txtViewOfInputAccessoryView =null;

public override void ViewDidLoad() {   
     base.ViewDidLoad();

if (inputAccessoryView == null) {

                inputAccessoryView = UI.ViewGrowingText.Create();

                txtViewOfInputAccessoryView = inputAccessoryView.GetTextView();

                inputAccessoryView.Frame =

                    new CoreGraphics.CGRect(0, 0, View.Frame.Width, txtViewOfInputAccessoryView.Frame.Height);

                inputAccessoryView.AutoresizingMask = UIViewAutoresizing.FlexibleHeight;

                 //把這個會長高長壯的GrowingTextView設定為底部的textView的鍵盤工具列

                txtMsg2Send.InputAccessoryView = inputAccessoryView;

             //先把最初的高度記下來.....

                orgHeightOfTxtViewOfInputAccessoryView = txtViewOfInputAccessoryView.Frame.Height;

            //重點來了!!文字變時.如何改變inputAccessoryView的高度!?

                txtViewOfInputAccessoryView.Changed += (object sender, EventArgs e) => {

                    var _t = new System.Threading.Thread(new System.Threading.ThreadStart(() => {

                        InvokeOnMainThread(async () => {

                            await Task.Delay(50);

                            //只比較textView高度到小數點三位數 

                            if (Math.Round(txtViewOfInputAccessoryView.Frame.Size.Height, 3, MidpointRounding.AwayFromZero) !=

                                             Math.Round(orgHeightOfTxtViewOfInputAccessoryView, 3, MidpointRounding.AwayFromZero)) {

                               //高度異動!!調整外層inputAccessoryView的高度

                             //光是用Frame=....是沒用的,要動到cosntraints裡才會作動!!

                                orgHeightOfTxtViewOfInputAccessoryView = (float)txtViewOfInputAccessoryView.Frame.Size.Height;


                                var cst =

                                   inputAccessoryView.Superview.Constraints.Where(Q => Q.Identifier() == "accessoryHeight").FirstOrDefault();

                                cst.Active = false;

                                inputAccessoryView.LayoutIfNeeded();

                                cst.Constant = orgHeightOfTxtViewOfInputAccessoryView;

                                cst.Active = true;

                                inputAccessoryView.Superview.AddConstraint(cst);

                                if (inputAccessoryView.Superview.Superview != null) {

                                    inputAccessoryView.Superview.Superview.LayoutIfNeeded();

                                }

                            }

                        });

                    }));

                    _t.Start();

           ...

          ...end of ViewDidLoad.....

  }  

-------------------------------------------------

結果....


是不是愈來愈有專業的樣子了呢?

OS:自從我用了GrowingTextView之後,考試都考一百分,而且人明顯高了、壯了、變得更美了,自信心都回到我身邊了(只差沒說武漢肺炎也好了)

上述那段紅字,請參考這裡  我只是把它改成xamarin c# 罷了,懂得真的太少了,真的要花點時間學swift了

另一種作法是在出現小鍵盤時,整個畫面往上捲,配合在UIViewController底部的GrowingText來做到這效果,請參這裡 的keyboard事件處理

哪個好!? 鐘鼎山林,人各有志,攏好啦

大家加油吧

(反正疫情期間哪都不能去,乖乖在家好好寫程式吧)


2021年5月25日 星期二

Xamarin.ios : UILabel要能接收click事件

 現在xamarin.ios的xib都只能在xcode之下設計了,著實非常不便

但沒辦法,實在不想用xamarin form 架構,只好認命了

UILabel雖然在xcode interfacebuilder中有「UserInteractionEnabled」設定可以讓你勾,

但,經過實驗,真的,你還是要在code中設定才能listen tap 事件,參考以下

------------------------------------

var tapRecognizer = new UITapGestureRecognizer();

            tapRecognizer.AddTarget(() => {

                 // tap時事件實作

                     ...

                    ...

                    ...

            });

            lblA.UserInteractionEnabled = true;

            tapRecognizer.NumberOfTapsRequired = 1;

            lblA.AddGestureRecognizer(tapRecognizer);

-------------------------------------

  我書讀不多,不知道原來addTarget是要這樣用(而不是action !?)

anyway,總之,要用AddTarget設定實作,UserInteractionEnabled要設定(雖然我已經在xcode設計階段就指定了,真的,還是要在code設定才行),NumberOfTapsRequired 也要指定,最後加入GestureRecognizer


參考:這裡

一起加油吧.

2021年5月21日 星期五

for android (xamrin.android)--切換activity時不要有動畫效果

 雖然有過場動畫會比較花俏可愛,但正式/商用app是不喜歡這種玩意兒的
如何取消過場動畫?
兩個指令就可以了

----在某個ativity裡要切換到下個actity的片段----------

Intent itxnNext= 

new Intent(this, typeof(下個actity類別的class路徑)).AddFlags(ActivityFlags.NoAnimation);

                StartActivity(itxnNext);

                OverridePendingTransition(0, 0);

                Finish();

-----------------------------------------------

注意!! 
OverridePenddingTransition指令一要在StartActivity指令之後,順序一定要對!!

不然你會試不出效果的!!

參考:這裡

一起加油吧


2021年4月1日 星期四

asp.net core web project 不給debug,直接「exited with code -1」結束

安安,給虧嗎? (會用「安安」的表示這一定是個老網民了)

安安不給虧不要緊,程式不給debug才麻煩吧

今天就是要講這樣一個故事--一個asp.net core web project從他台搬來新的PC

卻一直debug不行,直接結束,clear & rebuild也一樣,明明build都成功啊.....


試了很多次,跟之前的PC的環境比對,都查不出原因....
這時,請別再定睛在這console視窗畫面了,這個畫面是果,而因是在別的地方的--
來吧,看一下別的地方有沒有什麼線索漏了
嗯,好像在output window有相關的資訊....


看到了嗎?在我們的web application exe結束前,有個東西先掛了,他就是萬惡的(又在萬惡了.到底是多餓啊) iexplore.exe 啦,原來萬惡的藏鏡人tio係伊啦
先別管iexploere了,你聽過安X...,不,你聽過可以debug不用瀏覽器嗎?
當然行啊~
來吧,到專案的屬性,去把Build->Launch browser這項un-check掉,再來debug吧


如果一再遇到鬼打牆的事,那問題不是在對方,而是我們該改變一下方向了
大家加油吧


2021年3月16日 星期二

bitwise operation--合宜地操作bits ("ORing" and mask bits)

 就某32bit data而言  (ex : *pRccCfg)

經初始化0b0

我們把bit 22設定為1 之後 (by instruction : 「 *pRccCfg|= (1<<22) ; 」)

要把bit 24~26設定為0b110,又不能動到之前設定的其他bit值,如何是好?

作法1.一個bit一個bit設定

*pRccCfg!=(1<<25)

*pRccCfg!=(1<<26)

作法二,用罩除的方式,比較不建議請注意"~"的用法

*pRccCfg!=(7<<24); // "OR" the 3 bits by  0b111 

*pRccCfg &=~(1<<24);//shift the bit ,then "Complement them",then,use "AND" opeartion,

------------------------------------------------------------------------

同理,只是想清除某幾個bit,也是先 shift "on" bits ,"Complement  them",then ,use "AND"operation

ex:要把21&22 bits清除,但不要動到其他bits,請用以下方式

*pAddrRccCfg &=~(0x3<<21);

務必注意!!

~(0x3<<21) 是

11111111100111111111111111111111

而(~0x3<<21) 是

11111111100000000000000000000000 

千萬要注意順序

2021年2月24日 星期三

APNS從by certificate 到by jwt 的升級側記

apns一直都運作的好端端的, app客戶說要再加一個姊妹作,但是仍用同樣的apns機制(因為資料源都是一樣,只是內容有點差異)
於是故事就這樣展開了
目前apns server是windows server 2012,web project 是asp.net 4.5
參考以下的方式改寫了推播apns那段 
從此公主跟PG就過著幸福快樂的生活了.....想的美

當你trace到 var secretKey = CngKey.Import 時,會遇到「system cannot find the file specified 」例外,
可是明明路徑都正確啊......是的,你需要比較高的權限
相對的,你的application pool identity也要提高權限
然後....
你明明在IDE中執行httpClient.SendAsync都很正常,可是怎麼放在iis給他執行就出現這種例外
「call to SSPI failed, see inner exception. StackTrace:   at System.Net.Security.SslState.InternalEndProcessAuthentication(LazyAsyncResult lazyResult)
...
..
...」
答案是......server 2012的IIS不支援http/2
所以,請把你的server升級到server 2016再來打怪吧

花了半天升級了server,結果又是在httpClient.SendAsync出錯,這時是....「timeout」!?
可是明明在IDE debug確又正常啊.....
那就是要升級你的framework的時候了,把專案從4.5升級到4.6吧
(前輩如是說的.....https://stackoverflow.com/questions/32685151/how-to-make-the-net-httpclient-use-http-2-0)
還有,別再用httpTwo了而是用「WinHttpHandler」,如同第33則po文一樣--
-------------------
1.Make sure you are on the latest version of Windows 10.

2.Install WinHttpHandler:

Install-Package System.Net.Http.WinHttpHandler

3.Extend WinHttpHandler to add http2.0 support:

public class Http2CustomHandler : WinHttpHandler
{
    protected override Task<HttpResponseMessage> SendAsync(HttpRequestMessage request, System.Threading.CancellationToken cancellationToken)
    {
        request.Version = new Version("2.0");
        return base.SendAsync(request, cancellationToken);
    }
}

4.Pass above handler to the HttpClient constructor

using (var httpClient = new HttpClient(new Http2CustomHandler()))
{
      // your custom code
}
---------------------------------
(所以就是要用非同步的方式去呼叫了,沒差,用執行緒去做就是了)
雖然案主說你就再申請一個apns 憑證嘛.何必這樣大費周章?
可是每一個憑證每年都要換證,就是怕在換證時uer漏接了重要的訊息
這次一做,日後很多個APP都可以共用,也沒有期限問題,長痛不如短痛啊,根本性地解決問題,不亦快哉?

2021年2月21日 星期日

SecKeyChain.Add return Security.SecStatusCode.MissingEntitlement !?

 在xamarin ios經常更新,以往的加解密函數現在出現這現象
----code----

var s = new SecRecord(SecKind.GenericPassword) {

                ValueData = NSData.FromString(value),

                Generic = NSData.FromString(key),

                Invisible = true,

                CreationDate = NSDate.Now


            };

            var err = SecKeyChain.Add(s);

------------------

結果err傳回值是「Security.SecStatusCode.MissingEntitlement

好在別人已經踢到鐵板了,請參考以下的方式修改

https://forums.xamarin.com/discussion/145357/seckeychain-add-return-security-secstatuscode-missingentitlement

注意,其中的
------------

<key>keychain-access-groups</key>

<array>

<string>$(AppIdentifierPrefix)你的appBundle ID</string>

</array>

------------------------------------

紅色字$(AppIdentifierPrefix)要去掉,

這是用vs2019 IOS manifest Editor打開加入keychain選項他自己加上去的

要小心--盡信editor不如無editor


加油!!

2021年1月16日 星期六

for android : notification with vibration not work !?

 安卓開發就怕一直在改版的問題一再發生

最近很多開發者都遇到明明在notification的震動機制好好的,怎麼升級後又惦惦了

google了一下是要加上 audioattribute--
---example-----

 audioAttributes = new AudioAttributes.Builder()
                    .setContentType(AudioAttributes.CONTENT_TYPE_SONIFICATION)
                    .setUsage(AudioAttributes.USAGE_ALARM) //key
                    .build();
            mVibrator.vibrate(pattern, 1, audioAttributes);
-----------------
來源參考:
https://www.jianshu.com/p/3ec9158b2041
同場加映
有些圓標可以用線上的icon generator來產生
https://romannurik.github.io/AndroidAssetStudio/icons-launcher.html


請多加利用左側功能表中的background color等屬性
https://romannurik.github.io/AndroidAssetStudio/index.html <--這裡還有 notification icon generator可以用哦
(一升級就搞得大家雞飛狗跳的,希望馬斯克的手機系統不會這樣麻煩)
大家加油吧

2021年1月9日 星期六

初經驗--把.net core 專案發佈到他台主機IIS上遇到的問題

當你把彼端IIS & MSSQL express裝好了,並且也把「安裝 ASP.NET Core 模組/裝載套件組合」 裝好後,檔案也搬好了,你以為這樣就打完收工了?不,我們奇妙的冒險旅程才正要開始呢, 首你,把你先建立好的web & applicatoin 設好,port bind 也設了,用本機的網址去查驗一下 localhost:5000 結果出現這畫面....
去IIS的log查也沒有什麼具體的說明,只會讓你懷疑人生罷了 你需要一些踢過鐵板的人的經驗,參考....這個
看來看去,好像只有第四個選項「stdoutLogEnabled 」才是那一窗門,是的,那就打開他吧
--------------web.config-------------------------
<?xml version="1.0" encoding="utf-8"?>
<configuration>
  <location path="." inheritInChildApplications="false">
    <system.webServer>
      <handlers>
        <add name="aspNetCore" path="*" verb="*" modules="AspNetCoreModuleV2" resourceType="Unspecified" />
      </handlers>
      <aspNetCore processPath="dotnet" arguments=".\XXXXX.dll" stdoutLogEnabled="true" stdoutLogFile=".\logs\stdout" hostingModel="inprocess" />
    </system.webServer>
  </location>
</configuration>
---------------------------------------
改好改滿,重啟那個站台,再次request看看你的站台,你就會在你的.net core網站目錄下看到「logs」目錄,裡面有log檔了.....
--------------------------------
Unhandled exception. System.FormatException: Could not parse the JSON file.
 ---> System.Text.Json.JsonReaderException: 'S' is an invalid escapable character within a JSON string. The string should be correctly escaped. LineNumber: 10 | BytePositionInLine: 47.
   at System.Text.Json.ThrowHelper.ThrowJsonReaderException(Utf8JsonReader& json, ExceptionResource resource, Byte nextByte, ReadOnlySpan`1 bytes)
   at System.Text.Json.Utf8JsonReader.ConsumeStringAndValidate(ReadOnlySpan`1 data, Int32 idx)
   at System.Text.Json.Utf8JsonReader.ConsumeString()
-------------------------------
喏,看到了吧,是json檔設定有問題了,在佈署的資料夾中看到的json檔
最可疑的就是「appsettings.json」
-----------------------------------------


----------------------------------------
又是萬惡的斜線問題了,再加一條斜線改好後,重啟IIS那個.net core web後,其本上你用localhost:5000
去看,就是正常了


....那有用到database的部分,如何設定?
你除了是把.net core web 的application pool的identity設定為NetowrkService之外,
也要有sql server security & login的設定配合才行
參考這裡比較快 

解決:使用者’IIS APPPOOL\ASPNET v4.0’的登入失敗

可能比較正規的做法是這樣....

註 2021/02/23,不必如何大費周章,直接在appsettings.json改,
在connection string中,加入「;Integrated Security=false;」這屬性就是了

以上,大家加油了
(.net core 效能不錯的樣子,真香啊.....)